CPP面向对象
面向对象的三大特性:封装、继承、多态
C++认为万物皆为对象,对象上有其属性和行为
封装
封装的意义
封装是C++面向对象三大特性之一
封装的意义:
- 将属性和行为作为一个整体,表现生活中的事务
- 将属性和行为加以权限控制
在设计类的时候,属性和行为写在一起,表现事物
语法:class 类名 { 访问权限: 属性 / 行为 };
示例1:设计一个圆类,求圆的周长
#include <iostream>
#include <string>

using namespace std;

class Circle {
    private:
        const double Pi = 3.14;
        double radius;  // 半径

    public:
        // 构造函数
        Circle(double radius) {
            this->radius = radius;
        }

        // Getter
        double getRadius() {
            return this->radius;
        }

        // Setter
        double setRadius(double radius) {
            this->radius = radius;
        }

        // 计算周长
        double getPerimeter() {
            return 2 * this -> Pi * this -> radius;
        }

};
封装的权限控制
封装共有三种访问权限:
- 公共权限——public - 成员:类内可以访问,类外可以访问
- 保护权限——protect - 成员:类内可以访问,类外不可以访问 - 当具有继承关系后,子类可以访问父类中具有保护权限的成员
- 私有权限——private - 成员:类内可以访问,类外不可以访问 - 当具有继承关系后,子类不可以访问父类中具有保护权限的成员
示例:
#include <iostream>
#include <string>

using namespace std;

class Person {
// 公共属性
public:
    string name;
    int age;
// 私有属性
private:
    string id;
    string bankCard;

// 公共方法
public:
    Person(string name, int age,string id,string bankCard) {
        this->name = name;
        this->age = age;
        this->id = id;
        this->bankCard = bankCard;
    }

    string getId() {
        return id;
    }

    string getBankCard() {
        return bankCard;
    }

    void setId(string id) {
        this->id = id;
    }

    void setBankCard(string bankCard) {
        this->bankCard = bankCard;
    }
};

int main() {
    Person p("张三", 18, "A001", "A123456789");

    cout << "姓名:" << p.name << endl;
    cout << "年龄:" << p.age << endl;
    // cout << "身份证:" << p.id << endl; // 不能直接访问
    cout << "身份证:" << p.getId() << endl;
    // p.bankCard = "B123456789"   // 不能直接修改
    p.setBankCard("B123456789");

    return 0;
}
struct和class区别
在C++中struct和class唯一的区别就在于默认的访问权限不同
区别:
- struct默认权限为公共
- class默认权限为私有
示例:
#include <iostream>
#include <string>

using namespace std;

struct S1 {
    int s1;
};

class C1 {
    int c1;
};

int main() {
    S1 s1;
    C1 c1;

    s1.s1 = 1;
    c1.c1 = 1;  // 不可访问

    return 0;
}
成员属性设置为私有
优点1:将所有成员属性设置为私有,可以自己控制读写权限
优点2:对于写权限,还可以检验数据的有效性
示例:
#include <iostream>
#include <string>

using namespace std;

class XiaoMi {
private:
    int price = 2999;
    string color;

public:
    // 只提供访问价格的方法,不提供修改价格的方法
    int getPrice() {
        return price;
    }

    string getColor() {
        return color;
    }

    void setColor(string color) {
        // 对输入数据校验
        if (color == "white" || color == "black") {
            this -> color = color;
        }
        else {
            cout << "没有该型号" << endl;
        }
    }
};

int main() {
    XiaoMi xiaomi;
    xiaomi.setColor("white");
    cout << xiaomi.getColor() << endl;  // white

    xiaomi.setColor("red");             // 没有该型号
    cout << xiaomi.getColor() << endl;  // white

    //xiaomi.setPrice();  // 报错,没有该方法
    cout << xiaomi.getPrice() << endl;  // 2999

    return 0;
}
练习案例:设计矩形
设计矩形(Rectangle)
求出矩形的表面积和体积
分别用全局函数和成员函数判断两个立方体是否相等
参考答案:
#include <iostream>
#include <string>

using namespace std;

class Rectangle
{
private:
    int height;
    int length;
    int width;

public:
    Rectangle(int h, int l, int w) {
        height = h;
        length = l;
        width = w;
    }

    // Getter And Setter
    void setHeight(int h) {
        height = h;
    }

    int getHeight() {
        return height;
    }

    void setLength(int l) {
        length = l;
    }

    int getLength() {
        return length;
    }

    void setWidth(int w) {
        width = w;
    }

    int getWidth() {
        return width;
    }

    // 计算体积
    int getVolume() {
        return height * length * width;
    }

    // 计算表面积
    int getSurfaceArea() {
        return 2 * (height * length + height * width + length * width);
    }

    // 计算两矩形是否相等
    bool isEqual(Rectangle c2) {
        return height == c2.height && length == c2.length && width == c2.width;
    }
};

// 计算两矩形是否相等
bool isEqual(Rectangle c1, Rectangle c2) {
    return c1.isEqual(c2);
}

int main() {
    Rectangle c1(3, 4, 5);
    Rectangle c2(3, 4, 5);
    Rectangle c3(5, 4, 3);

    cout << "c1和c2是否相等:" << (isEqual(c1, c2) ? "是" : "否") << endl;
    cout << "c1和c2是否相等:" << (c1.isEqual(c2) ? "是" : "否") << endl;
    cout << "c1和c3是否相等:" << (isEqual(c1, c3) ? "是" : "否") << endl;

    cout << "c1的体积为:\t" << c1.getVolume() << endl;
    cout << "c1的表面积为:\t" << c1.getSurfaceArea() << endl;

    return 0;
}
对象的初始化和清理
创建对象的两种方式
栈区创建对象
在栈区创建对象,也有两种方式
无初始值创建:类名 对象名;
创建时有初始值:类名 对象名(值...)
注意:无初始值创建对象需要类中存在空参构造函数,有初始值创建对象需要类中存在有参构造函数
注意:无初始值创建对象注意不要添加括号
类名 对象名();,编译器会误认这是个函数而非对象关于构造函数,可以跳转到构造函数和析构函数
示例:
#include <iostream>
#include <string>

using namespace std;

class C {
private:
    int a;
public:
    // Constructor
    C() {}// 无参构造

    C(int a) {// 有参构造
        this->a = a;
    }

    // Getter And Setter
    int getA() {
        return a;
    }

    void setA(int a) {
        this->a = a;
    }
};

int main() {
    C c1;  // 创建在栈中
    c1.setA(10);

    C c2(11);  // 创建在栈中

    cout << c1.getA() << endl; // 10
    cout << c2.getB() << endl; // 20

    return 0;
}
堆区创建对象
和栈区创建对象类似,分为有初始值和无初始值
无初始值:类名* 对象名 = new 类名();
有初始值:类名* 对象名 = new 类名(值1);
示例:
#include <iostream>
#include <string>

using namespace std;

class C {
private:
    int a;
public:
    // Constructor
    C() {}

    C(int a) {
        this->a = a;
    }

    // Getter And Setter
    int getA() {
        return a;
    }

    void setA(int a) {
        this->a = a;
    }
};

int main() {
    C* c1 = new C();
    c1->setA(10);

    C* c2 = new C(20);

    cout << c1->getA() << endl; // 10
    cout << c2->getA() << endl; // 20

    return 0;
}
匿名对象
匿名对象理解为创建对象时,不提供对象名
语法:类名(值)
#include <iostream>
#include <string>

using namespace std;

class C {
private:
    int a;
public:
    // Constructor
    C() {}

    C(int a) {
        this->a = a;
    }

    // Getter And Setter
    int getA() {
        return a;
    }

    void setA(int a) {
        this->a = a;
    }
};

int main() {
C(10);// 匿名对象

    return 0;
}
构造函数和析构函数
对象的初始化和清理是两个十分重要的安全问题
一个对象或者变量没有初始状态,对其使用后果是未知的
同样的使用完一个对象或变量,没有及时清理,也会造成一定的安全问题
C++利用了构造函数和析构函数解决上述问题,这两个函数将会被编译器自动调用,完成对象初始化和清理工作
对象的初始化和清理工作是编译器强制要求程序员完成的事情,因此如果程序员不提供构造和析构,编译器会自动提供构造函数和析构函数(不过是空实现)
- 构造函数:主要作用在于创建对象时为对象的成员属性赋值,构造函数由编译器自动调用,无需手动调用
- 析构函数:主要作用在于对象销毁前系统自动调用,执行一些清理工作
构造函数语法:类名() {}
- 构造函数,没有返回值也不写void
- 函数名称与类型相同
- 构造函数可以有参数,所以可以发生重载
- 程序在调用对象时会自动调用构造,无需手动调用,而且只会调用一次
析构函数语法:~类名() {}
- 析构函数,没有返回值也不写void
- 函数名称与类名相同,在名称前加上符号
~与构造函数区别开来 - 析构函数不可以有参数,因此不能发生重载
- 程序在对象销毁前会自动调用析构,无需手动调用,而且只会调用一次
示例:
#include <iostream>
#include <string>

using namespace std;

class Person {
private:
    string name;

public:
    // Constructor
    Person() {
        name = "";
        cout << "无参构造函数被调用了" << endl;
    }

    Person(string name) {
        this->name = name;
        cout << "有参构造函数被调佣了" << endl;
    }

    // Getter And Setter
    string getName() {
        return name;
    }

    void setName(string name) {
        this->name = name;
    }


    // Destructor
    ~Person() {
        cout << "析构函数被调用了" << endl;
    }
};

int main() {
    // 为了不让编译器自动调用析构函数,所以在堆区创建对象
    Person* p1 = new Person("张三");  // 有参构造函数被调佣了
    Person* p2 = new Person();  // 无参构造函数被调佣了

    delete p1;  // 析构函数被调用了
    delete p2;  // 析构函数被调用了

    return 0;
}
构造函数的分类及调用
两种分类方式:
- 按参数分为: - 有参构造 - 无参构造
- 按类型分为: - 普通构造 - 拷贝构造
三种调用方式:
- 括号法
- 显示法
- 隐式转换法
示例:
#include <iostream>
#include <string>

using namespace std;

class Person {
private:
    string name;

public:
    // Constructor
    Person() {
        name = "";
        cout << "无参构造函数被调用了" << endl;
    }

    Person(string name) {
        this->name = name;
        cout << "有参构造函数被调佣了" << endl;
    }

    Person(const Person& p) {
        name = p.name;
        this->setName(name);
        cout << "拷贝构造函数被调用了" << endl;
    }

    // Getter And Setter
    string getName() {
        return name;
    }

    void setName(string name) {
        this->name = name;
    }


    // Destructor
    ~Person() {
        cout << "析构函数被调用了" << endl;
    }
};

int main() {
    Person* p1 = new Person("张三");
    Person* p2 = new Person(*p1);

    cout << "p1的姓名是:" << p1->getName() << endl; // 张三
    cout << "p2的姓名是:" << p2->getName() << endl; // 张三

    // 括号法
    Person p3;
    Person p4("王五");

    // 显示法
    Person p5 = Person("赵六");

    // 匿名对象
    // 不要利用拷贝构造函数创建匿名对象,如Person(p3);编译器会认为Person(p3) === Person p3;
    Person("李四");

    // 隐式转换法
    Person p6 = (string)"Hello";    // C++禁止连续的用户定义隐式转换,所以需要加上(string)
    Person p7 = p5;

    return 0;
}
拷贝构造函数调用时机
C++中拷贝构造函数调用时机通常有三种情况
- 使用一个已经创建完毕的对象来初始化一个新对象
- 值传递方式给函数参数传值
- 以值方式返回局部对象
示例:
#include <iostream>
#include <string>

using namespace std;

class C {
private:
    int a;

public:
    C() {
        cout << "C()" << endl;
    }

    C(int a) {
        this->a = a;
        cout << "C(int)" << endl;
    }

    C(const C& c) {
        this->a = c.a;
        cout << "C(const C&)" << endl;
    }

    ~C() {
        cout << "~C()" << endl;
    }

    // Getter And Setter
    int getA() {
        return a;
    }

    void setA(int a) {
        this->a = a;
    }
};

// 1. 拷贝构造函数初始化对象
void func01() {
    C c1(10);   // C(int)
    C c2(c1);   // C(const C&)
}

// 2. 值传递方式给函数参数传递
void test1(C c) {};

void func02() {
    C c1(10);   // C(int)
    test1(c1);   // C(const C&)  相当于创建了一个临时对象当作函数参数
}

// 3. 值方式返回局部对象
C test2() {
    return C(10);   // C(int);
}

void func03() {
    C c1 = test2();   // C(const C&)    注意这里不同编译器不同版本结果不同
}

int main() {
    //func01();
    //func02();
    func03();

    return 0;
}
构造函数的调用规则
默认情况下C++编译器至少给一个类添加三个函数
- 默认构造函数(无参,函数体为空)
- 默认析构函数(无参,函数体为空)
- 默认拷贝构造函数,对属性进行值拷贝
构造函数调用规则如下:
- 如果用户定义有参构造函数,C++不再提供默认无参构造,但是会提供默认拷贝构造
- 如果用户定义拷贝构造函数,C++不会再提供其他构造函数
⭐深拷贝与浅拷贝⭐
浅拷贝:简单的赋值拷贝操作
深拷贝:在堆区重新申请空间,进行拷贝操作
| 特性 | 浅拷贝 (Shallow Copy) | 深拷贝 (Deep Copy) |
|---|---|---|
| 复制内容 | 对象成员的值(包括指针地址) | 对象成员的值 + 指针指向的实际数据 |
| 内存关系 | 新旧对象共享同一块动态内存 | 新旧对象拥有完全独立的内存区域 |
| 拷贝方式 | 编译器默认生成的拷贝行为 | 需手动实现拷贝构造函数/赋值运算符 |
| 危险场景 | 重复释放导致崩溃、数据污染 | 无副作用(资源完全独立) |
| 性能代价 | 零额外开销(仅复制指针) | 较高开销(需内存分配和内容复制) |
| 应用场景 | 无动态资源的简单对象(如基本类型、不含指针的类) | 包含指针、文件句柄等动态资源的对象 |
示例:
⚠错误的代码如下所示
#include <iostream>
#include <string>

using namespace std;

class Person {
public:

    string name;
    int* age;

    // 构造函数
    Person(string name, int age) {
        this->name = name;
        this->age = new int(age);   // 在堆区分配,还需要手动释放,new返回指针
        cout << "构造函数" << endl;
    }

    // 析构函数
    ~Person() {
        if (age != nullptr) {
            delete age;
            age = nullptr;
        }
        cout << "析构函数" << endl;
    }
};

int main() {
    Person p1("张三", 18);
    cout << "p1的名字:" << p1.name << "," << "p1的年龄:" << *p1.age << endl;

    Person p2(p1);  // 如果是编译器生成的拷贝构造函数,那么就会进行浅拷贝
    cout << "p2的名字:" << p2.name << "," << "p2的年龄:" << *p2.age << endl;

    return 0;
}
出现错误的原因:重复释放导致崩溃(也就是说调用了两次析构函数,重复删除了同一个堆区的资源)
修复的方式就是替换编译器生成的拷贝构造函数,将浅拷贝转换为深拷贝:
#include <iostream>
#include <string>

using namespace std;

class Person {
public:

    string name;
    int* age;

    // 构造函数
    Person(string name, int age) {
        this->name = name;
        this->age = new int(age);   // 在堆区分配,还需要手动释放,new返回指针
        cout << "构造函数" << endl;
    }

    // 自行定义拷贝函数
    Person(const Person& p) {
        this->name = p.name;
        // this->age = p.age; 编译器默认实现就是这行
        this->age = new int(*p.age);    // 重新在堆区申请一个空间,并赋值
        cout << "拷贝构造函数" << endl;
    }

    // 析构函数
    ~Person() {
        if (age != nullptr) {
            delete age;
            age = nullptr;
        }
        cout << "析构函数" << endl;
    }
};

int main() {
    Person p1("张三", 18);
    cout << "p1的名字:" << p1.name << "," << "p1的年龄:" << *p1.age << endl;

    Person p2(p1);  // 如果是编译器生成的拷贝构造函数,那么就会进行浅拷贝
    cout << "p2的名字:" << p2.name << "," << "p2的年龄:" << *p2.age << endl;

    return 0;
}
初始化列表(推荐初始方法)
作用:C++提供了初始化列表语法,用来初始化属性
语法:构造函数(): 属性1 (值1),属性2 (值2) ... {}
示例:
#include <iostream>
#include <string>

using namespace std;

class C {
private:
    int a;
    int b;
    int c;
public:
    // 初始化列表
    C() : a(10), b(20), c(30) {}  // 本质就是带有默认值的无参构造函数

    C(int a, int b, int c){
        this->a = a;
        this->b = b;
        this->c = c;
    }

    void print(){
        cout << "a = " << a << endl;
        cout << "b = " << b << endl;
        cout << "c = " << c << endl;
    }
};

int main() {
    C c1;
    c1.print(); // a = 10 b = 20 c = 30

    return 0;
}
类对象作为类成员
C++中的成员可以是另一个类的对象
例如:
class A {}
class B {
A a;
}
B类中有对象A作为成员,A为对象成员
示例:
#include <iostream>
#include <string>

using namespace std;

class A {
public:
    A() {
        cout << "调用了A构造函数" << endl;
    }

    ~A() {
        cout << "调起了A析构函数" << endl;
    }
};

class B {
private:
    A a;

public:
    B() {
        cout << "调起了B构造函数" << endl;
    }

    B(A a) {
        this -> a = a;
    }

    ~B() {
        cout << "调起了B析构函数" << endl;
    }
};

int main() {
    B b;    // 顺序: 调用A构造函数 -> 调用B构造函数 -> 调用B析构函数 -> 调用A析构函数

    return 0;
}
结论:构造函数顺序是先构造自身,再构造其它类,析构先析构其他类,最后析构自身
静态成员
静态成员就是在成员变量和成员函数前加上关键字static,称为静态成员
静态成员分为:
- 静态成员变量
- 所有对象共享一份数据
- 在编译阶段分配内存
- 类内声明,类外初始化
- 静态成员函数
- 所有对象共享同一个函数
- 静态成员函数只能访问静态成员变量
静态成员变量
示例:
#include <iostream>
#include <string>

using namespace std;

class C {
public:
    // 类内声明
    static int a;
    int b;

    C(int b) {
        this ->b = b;
    }
};

// 类外初始化
int C::a = 10;

int main() {

    C c1(20);
    C c2(30);

    cout << c1.a << endl;   // 10
    cout << c2.a << endl;   // 10

    C::a = 100;

    cout << c1.a << endl;   // 100
    cout << c2.a << endl;   // 100

    c2.a = 200;

    cout << c1.a << endl;   // 200
    cout << c2.a << endl;   // 200

    return 0;
}
注意:类的静态变量初始化不能写在main函数中
这是因为类的静态成员变量属于类本身而非对象实例,其生命周期与程序一致,必须在
main函数执行前完成初始化
而main函数是程序执行的入口,此时已进入运行时阶段,无法满足静态成员在编译期/链接期的初始化要求
静态成员方法
示例:
#include <iostream>
#include <string>

using namespace std;

class C {
public:
    // 类内声明
    static int a;
    int b;

    C(int b) {
        this ->b = b;
    }

    static void printStatic() {
        cout << a << endl;
        // cout << b << endl;  // 静态方法不能访问非静态成员变量
    }

    void print() {
        cout << a << endl;  // 非静态方法可以访问静态成员变量
        cout << b << endl;
    }
};

// 类外初始化
int C::a = 10;

int main() {

    C c1(1);
    C::printStatic();
    c1.print();

    return 0;
}
C++对象模型和this指针
成员变量和成员函数分开存储
在C++中,类内的成员变量和成员函数分开存储
只有非静态成员变量才属于类的对象上
#include <iostream>
#include <string>

using namespace std;

// 成员变量和成员函数是分开存储的
class EmptyClass {};

class C {
public:
    int a;  // 属于类的对象上

    static int b;   // 不属于类的对象上

    void func() {}; // 不属于类的对象上

    static void staticfunc() {}; // 不属于类的对象上
};

int C::b = 100;

int main() {

    EmptyClass ec;
    cout << sizeof(ec) << endl; // 空对象占用内存大小为1字节

    C c;
    cout << sizeof(c) << endl;
    // 占用内存大小为4字节,因为C类中有一个非静态成员变量数据类型为int
    // 如果再添加一个非静态成员变量,且该变量数据类型为int,那么对象占用内存大小为8字节
    // 但是静态成员变量、成员方法、静态成员方法都不属于类的对象,所以对象占用内存大小为4字节

    return 0;
}
this指针概念
每一个静态成员函数只会诞生一份函数实例,也就是说多个同类型的对象会公用一块代码
而C++通过特殊的对象指针this指针,区分了是谁调用了这块代码。this指针指向被调用的成员函数所属的对象
this指针是隐含每一个非静态成员函数内的一种指针
this指针不需要定义,直接使用即可
this指针的用途:
- 当形参和成员变量同名时,可用this指针来区分
- 在类的非静态成员函数中返回对象本身,可使用return *this;
#include <iostream>
#include <string>

using namespace std;

class C {
public:
int a;
int b;

C() {
a = 0;
        b = 0;
}

    C(int a,int b) {
this->a = a;
        this->b = b;
}

    C(const C& c) {
a = c.a;
        b = c.b;
}

C getMySelf() {
return *this;
}

C& addC(const C& c) {// 返回值是对象引用,所以可以链式调用
this->a += c.a;
this->b += c.b;
        return *this;
}

C addCwhitNoRef(const C& c) {
this->a += c.a;
this->b += c.b;
return *this;
}
};

int main() {
C c1(10, 20);

C c2(c1.getMySelf());

cout << "c1.a = " << c1.a << ",c1.b = " << c1.b << endl;// c1.a = 10,c1.b = 20
cout << "c2.a = " << c2.a << ",c2.b = " << c2.b << endl;// c2.a = 10,c2.b = 20

    c1.addC(c2).addC(c2).addC(c2);

    cout << "c1.a = " << c1.a << ",c1.b = " << c1.b << endl;// c1.a = 40,c1.b = 80

c2.addCwhitNoRef(c1).addCwhitNoRef(c1).addCwhitNoRef(c1);
/*
实际执行过程:
第一次addCwhitNoRef(c1):修改原c2对象值(c2.a=10+40=50,c2.b=20+80=100),返回临时拷贝对象(值为50,100)
第二次addCwhitNoRef(c1):在临时对象上操作(50+40=90,100+80=180),返回新临时对象
第三次addCwhitNoRef(c1):在第二个临时对象上操作(90+40=130,180+80=260)
最终结果:只有第一次调用修改了原c2对象,后续操作均在临时对象上进行,因此最终c2.a=50,c2.b=100
要获取正确的值需要创建一个新对象接收临时对象的值
*/

    cout << "c2.a = " << c2.a << ",c2.b = " << c2.b << endl;// c2.a = 50,c2.b = 100

return 0;
}
空指针访问成员函数
C++中空指针也是可以调用成员函数,但是也要注意有没有用到this指针
如果用到this指针,需要加以判断保证代码的健壮性
示例:
#include <iostream>
#include <string>

using namespace std;

class C {
public:
int a;

void ShowClassName() {
// 空指针对象调用该方法没有问题
cout << "我是Person类" << endl;
}

void ShowNum() {
// 空指针对象调用该方法会出现问题(未定义行为)
// 这是因为此时this指针为空,表示对象不存在,所以访问对象成员变量会出错
cout << this->a << endl;
}

void ShowRightNum() {
if (this == NULL) {
return;
}
else {
cout << this->a << endl;
}
}
};

int main() {
C* c = NULL;

c->ShowClassName();
// c->ShowNum();
c->ShowRightNum();

return 0;
}
const修饰成员函数
常函数:
- 成员函数后加const后称这个函数为常函数
- 常函数内不可以修改成员属性
- 成员属性声明时加关键字mutable后,在常函数中依然可以修改
- 语法:
void func() const {}
常对象:
- 声明对象前加const称该对象为常对象
- 常对象只能调用常函数
- 语法:
const 类名 对象名();
示例:
#include <iostream>
#include <string>

using namespace std;

class A {
public:
int a;
mutable int b;

A() {
cout << "A()" << endl;
}

    A(int a,int b) {
cout << "A(int)" << endl;
this->a = a;
this->b = b;
}

//void setA(int a) const {
//this->a = a;// 报错,因为const函数不能改变成员变量的值
//}

void setB(int b) const {
this->b = b;// 允许,因为const函数可以改变mutable成员变量的值
}
};

class B {
public:
void ShowClassName() {
cout << "B" << endl;
}

void ShowWord() const {
cout << "Hello World" << endl;
}
};

int main() {
A a(1, 2);
a.setB(4);

cout << "a.a = " << a.a << "," << "b.b = " << a.b << endl;

    const B b;

    // b.ShowClassName();// 报错,常对象不能访问非 常函数
    b.ShowWord();

return 0;
}
注意事项1:常函数的const位置在函数名()后面加
注意事项2:常对象不是指创建类时添加const,而是在声明对象时添加
友元(目前不知道具体用处)
假设你有一个家庭,家里有一个 保险箱(类 SafeBox),它有一些私密的属性,比如密码、存放的贵重物品等。这些信息是 私有的(private),只有家庭成员才能知道和使用。
但有一天,你请了一个 家政服务人员(类 Cleaner) 来打扫卫生,他不是你的家人,但你想让他临时能打开保险箱,把一些贵重物品拿出来擦洗。
在现实生活中,你可以选择 信任他,并告诉他密码 —— 这就相当于在程序中将他设为“友元”。
友元的目的就是让一个函数或者类访问另一个类中私有成员
友元的关键字:friend
友元的三种实现:
- 全局函数做友元
- 类做友元
- 成员函数做友元
全局函数做友元
基础使用案例:
#include <iostream>
#include <string>

using namespace std;

class SafeBox {
friend void Cleaner(SafeBox &safebox);// friend可以使该函数变为公共函数,这样就能访问私有成员了

private:
int pin;
string valuable;

public:
SafeBox(int pin, string valuable) {
this->pin = pin;
this->valuable = valuable;
}
};

void Cleaner(SafeBox &safebox) {
cout << "Cleaning..." << endl;
safebox.pin = 0;
safebox.valuable = "";
    cout << "Cleaned!" << endl;
cout << "Pin: " << safebox.pin << endl;
    cout << "Valuable: " << safebox.valuable << endl;
}

int main() {

SafeBox safebox(1234, "Money");
    Cleaner(safebox);

return 0;
}
类做友元
和全局函数做友元类似,只需要将函数替换为类即可:
#include <iostream>
#include <string>

using namespace std;

class SafeBox {
private:
    string password = "123456"; // 密码初始值
    string valuable = "Necklace";   // 贵重物品初始值

    // 类 Cleaner 是 SafeBox 的友元类
    friend class Cleaner;
};

class Cleaner {
public:
    void openSafeBox(SafeBox& box) {
        cout << "Cleaner opened the safe box." << endl;
        cout << "Treasure inside: " << box.valuable << endl;
        cout << "Password is: " << box.password << endl;
    }
};

int main() {
    SafeBox box;
    Cleaner cleaner;

    cleaner.openSafeBox(box);

return 0;
}
成员函数做友元
#include <iostream>
#include <string>

using namespace std;

class SafeBox; // 前向声明SafeBox类

class Cleaner {
public:
    void cleanRoom(SafeBox& box); // 声明函数(定义后置)
    void vacuumCarpet() {
        cout << "Vacuuming the carpet. No access to safe box." << endl;
    }
};

class SafeBox {
private:
    string password = "123456";
    string valuable = "Diamond Ring";
    friend void Cleaner::cleanRoom(SafeBox& box); // ✅ 合法声明
};

// Cleaner成员函数实现(需在SafeBox定义之后)
void Cleaner::cleanRoom(SafeBox& box) {
    cout << "Cleaner is cleaning the room." << endl;
    cout << "He can see the treasure: " << box.valuable << endl;
    cout << "And also knows the password: " << box.password << endl;
}

int main() {

    SafeBox box;
    Cleaner cleaner;

    cleaner.cleanRoom(box);   // ✅ 可以访问 SafeBox 的私有成员
    cleaner.vacuumCarpet();   // ❌ 不能访问 SafeBox 的私有成员

return 0;
}
一定要注意类、成员函数声明和定义的位置!
sequenceDiagram Compiler->>Preprocessor: 处理前向声明 Preprocessor->>Compiler: 提供SafeBox符号 Compiler->>Cleaner类解析: 确认cleanRoom函数签名 Compiler->>SafeBox类解析: 验证友元声明合法性 Compiler->>Function定义: 生成访问权限代码
记忆技巧:声明主体类 → 声明友元类(并在该类中声明相关函数) → 主体类授权友元函数 → 友元类实现函数体
错误代码示范:
#include <iostream>
#include <string>

using namespace std;

class Cleaner;

class SafeBox {
private:
    string password = "123456";
    string valuable = "Diamond Ring";

    // 允许 Cleaner 类中的 cleanRoom 函数作为友元
    friend void Cleaner::cleanRoom(SafeBox& box);
};

class Cleaner {
public:
    void cleanRoom(SafeBox& box) {
        cout << "Cleaner is cleaning the room." << endl;
        cout << "He can see the treasure: " << box.valuable << endl;
        cout << "And also knows the password: " << box.password << endl;
    }

    void vacuumCarpet() {
        cout << "Vacuuming the carpet. No access to safe box." << endl;
        // 不能访问 SafeBox 的 private 成员
        // cout << box.password; // ❌ 编译错误
    }
};

int main() {

    SafeBox box;
    Cleaner cleaner;

    cleaner.cleanRoom(box);   // ✅ 可以访问 SafeBox 的私有成员
    cleaner.vacuumCarpet();   // ❌ 不能访问 SafeBox 的私有成员

return 0;
}
核心错误原因:
当SafeBox类声明friend void Cleaner::cleanRoom(SafeBox& box)时:
- 此时
Cleaner类只有前向声明(class Cleaner;) - 编译器不知道
Cleaner类中有cleanRoom成员函数(类定义未完成) - 引发编译错误:
'cleanRoom' is not a member of 'Cleaner'
通俗类比:
想象您要给朋友(Cleaner)一把家门钥匙(友元权限),但:
- 您提前说了句”我有个朋友叫张三”(前向声明)
- 然后直接说”给张三的手枪装子弹权限”(声明友元成员函数)
- 结果警察发现张三根本没有手枪(成员函数未定义)
运算符重载
运算符重载概念:对已有的运算符重新进行定义,赋予其另一种功能,以适应不同的数据类型
加号运算符重载
作用:实现两个自定义数据类型相加的运算,比如C c1 = c2 + c3;
#include <iostream>
#include <string>

using namespace std;

class FruitBasket {
public:
    int apples;
    int bananas;

    // 构造函数
    FruitBasket(int a = 0, int b = 0) : apples(a), bananas(b) {}

    // 加号运算符重载(成员函数)
    FruitBasket operator+(const FruitBasket& fruitbasket) const {   // 常函数,保证不修改当前对象的状态
        return FruitBasket(this->apples + fruitbasket.apples, this->bananas + fruitbasket.bananas);
    }

    // 打印函数
    void print() const {
        cout << "Apples: " << apples << ", Bananas: " << bananas << endl;
    }
};

// 函数也可以运算符重载
FruitBasket operator+(const FruitBasket& f, int number) {
    FruitBasket res;
    res.apples = f.apples + number;
    res.bananas = f.bananas + number;

    return res;
}


int main() {

    FruitBasket f1(10, 20);
    FruitBasket f2(15, 20);

    FruitBasket f3 = f1 + f2;

    f3.print(); // Apples: 25, Bananas: 40

    FruitBasket f4 = f1 + 5;
    f4.print(); // Apples: 15, Bananas: 25

    return 0;
}
成员函数重载本质调用为:Fruitbasket f3 = f1.operator+(f2);
普通函数重载本质调用为:Fruitbasket f4 = operator+(f1,5);
左移运算符重载(cout重写)
作用:可以输出自定义数据类型,符号位<<
提示:Java中的toString函数重写
注意:实现左移运算符重载,不能在类中实现,需要利用全局函数实现,这一点需要与Java区分开
示例:
#include <iostream>
#include <string>

using namespace std;

class FruitBasket {
public:
    int apples;
    int bananas;

    // 构造函数
    FruitBasket(int a = 0, int b = 0) : apples(a), bananas(b) {}

};

// 左移运算符重载,只能利用全局函数
void operator<<(ostream &out, const FruitBasket &fb) {
    out << "There are " << fb.apples << " apples and " << fb.bananas << " bananas in the basket." << endl;
}

int main() {
    FruitBasket fb(10, 20);
    cout << fb;

    return 0;
}
关于为什么左移运算符不能在类中实现
问题本质:cout << obj 的调用机制
你希望实现这样的语法:
FruitBasket fb(10, 20); cout << fb;
这实际上等价于:
operator<<(cout, fb);
也就是说,第一个参数是 ostream 对象(如 cout),而 第二个参数才是你的类对象。
为什么不能用成员函数?
成员函数重载的规则:
- 当你将一个运算符重载为成员函数时,左边的操作数自动是当前对象(即 *this)
- 所以对于 a + b,如果写成成员函数,它只能成为 a.operator+(b),即第一个操作数必须是该类的对象
应用于 <<:
- 如果你在 FruitBasket 类中写成:
void operator<<(const FruitBasket& other); - 那么调用会变成:
fb1 << fb2; // 等价于 fb1.operator<<(fb2) - 但你想写的是:
cout << fb; // ostream << FruitBasket
而 cout 是 ostream 类型的对象,并不是你的类对象,所以无法用成员函数处理。
如果尝试把 void operator<<ostream &out, const FruitBasket &fb)直接写在类中,是 不允许的,原因如下:
语法错误:不能将二元运算符重载为类成员函数时有两个参数
在 C++ 中,所有作为类成员函数的运算符重载,最多只能有一个显式参数(即右边的操作数)
其次在调用时,不符合直觉
FruitBasket fb1, fb2;fb1 << (cout, fb2); // ❌ 非法调用方式,不符合直觉
如果输出时涉及到类的私有属性,还需要将重载函数添加为友元
递增运算符重载
作用:通过重载递增运算符,实现自己的整型数据
效果如下:
cout << myint << endl;
cout << ++myint << endl;
cout << myint++ << endl;
示例:
#include <iostream>
#include <string>

using namespace std;

class FruitBasket {
friend ostream &operator<<(ostream &os, const FruitBasket &fb); // 将全局输出函数设置为友元

private:
    int apples;

public:
    // 构造函数
    FruitBasket(int a = 0) : apples(a) {}

    // 1. 递增函数重载
    // 1.1 前置递增
    FruitBasket& operator++() { // 这里返回的是引用对象,否则会返回一个对象副本
        this->apples++;         // 当++(++fb)这样的形式调用时,多次调用++时,会返回一个对象副本,而不是引用对象
        return *this;
    }

    // 1.2 后置递增
    FruitBasket operator++(int) {
        FruitBasket temp = *this;
        this->apples++;
        return temp;
    }
};

ostream &operator<<(ostream &os, const FruitBasket &fb) {
    os << "There are " << fb.apples << " apples in the basket." << endl;
    return os;
}

int main() {
    FruitBasket fb(10);
    cout << fb << endl;// 10
    cout << ++fb << endl;   // 前置递增
    cout << fb++ << endl;   // 后置递增
    cout << fb << endl;
    return 0;
}
实现前置递增函数重载时,注意返回的类型是当前类的引用对象
如果不返回引用对象,那么代码的结果如下:
// 简化代码
// ...
FruitBasket operator++() {
    this->apples++;
    return *this;
}
// ...

int main() {
FruitBasket fb(10);
cout << ++(++fb) << endl;// 12
cout << fb << endl;// 11
}

/*
问题说明:
第一次 ++fb 执行:

原对象 fb.apples → 11
返回值:生成临时对象副本 temp1(apples=11)
第二次 ++(temp1) 执行:

临时对象 temp1.apples → 12
返回值:生成新临时对象 temp2(apples=12)
输出 temp2 → 显示 12
最终 fb 的状态:

仅被递增一次 → apples=11
*/
赋值运算符重载
C++编译器至少给一个类添加4个函数
- 默认构造函数(无参,函数体为空)
- 默认析构函数(无参,函数体为空)
- 默认拷贝构造函数,对属性进行值拷贝
- 赋值运算符
operator=,对属性进行赋值
在深拷贝与浅拷贝这章,提到过如果像将一个对象直接赋值给另一个对象,可以通过拷贝构造函数实现C c1(c2)。
这一章,则是利用赋值运算符实现C c1 = c2,正常来说,编译器会自动添加赋值运算符的重载函数,所以也会出深拷贝这一章中相同的问题重复释放导致崩溃(重复删除了同一个堆区的资源)
下面是错误案例:
#include <iostream>
#include <string>

using namespace std;

class C {
public:
    int *a;

    C(int a) {
        this->a = new int(a);
    }

    ~C() {
        if (a != nullptr) {
            delete a;
            a = nullptr;
        }
    }
};

int main() {
    C c1(1);
    C c2(2);
    c2 = c1;

    cout << *c1.a << endl;
    cout << *c2.a << endl;

    return 0;
}
解决方法也和之前相似,就是将浅拷贝转换为深拷贝:
#include <iostream>
#include <string>

using namespace std;

class C {
public:
    int *a;

    C(int a) {
        this->a = new int(a);
    }

    ~C() {
        if (a != nullptr) {
            delete a;
            a = nullptr;
        }
    }

    C& operator=(const C &c) {
        if (this->a != nullptr) {   // 判断是否有值在堆区
            delete this->a;
            this->a = nullptr;
        }

        this->a = new int(*c.a);
        return *this;
    }
};

int main() {
    C c1(1);
    C c2(2);
    C c3(3);
    c3 = c2 = c1;   // 想要实现连续赋值效果,需要赋值运算符函数的返回值为当前对象的自身(引用对象)

    cout << *c1.a << endl;
    cout << *c2.a << endl;
    cout << *c3.a << endl;

    return 0;
}
关系运算符重载
作用:重载关系运算符,可以让两个自定义类型对象进行对比操作
示例:
#include <iostream>
#include <string>

using namespace std;

class C {
public:
    int a;
    string b;

    C(int a,string b) {
        this->a = a;
        this->b = b;
    }

    bool operator==(const C &c) {
        return (this->a == c.a && this->b == c.b) ? true : false;
    }

    bool operator!=(const C &c) {
        return !(*this == c);
    }
};

int main() {
    C c1(10, "a");
    C c2(10, "b");
    C c3(10, "c");

    cout << (c1 == c1) << endl; // 1
    cout << (c1 != c1) << endl; // 0
    cout << (c1 == c2) << endl; // 0
    cout << (c1 != c3) << endl; // 1

    return 0;
}
函数调用运算符重载
- 函数调用运算符
()也可以重载 - 由于重载后使用的方式非常像函数的调用,因此称为仿函数
- 仿函数没有固定写法,非常灵活
示例:
#include <iostream>
#include <string>

using namespace std;

class Printer {
public:
    // 重载调用函数
    void operator()(string s) {
        cout << s << endl;
    }
};

int main() {
    Printer p;
    p("hello world");   // 与全局函数调用很相似,所以称为仿函数

    Printer()("hello world");   // 匿名对象调用仿函数

    return 0;
}
继承
继承是面向对象三大特性之一
有些类与类之间存在特殊的关系,例如下图中:
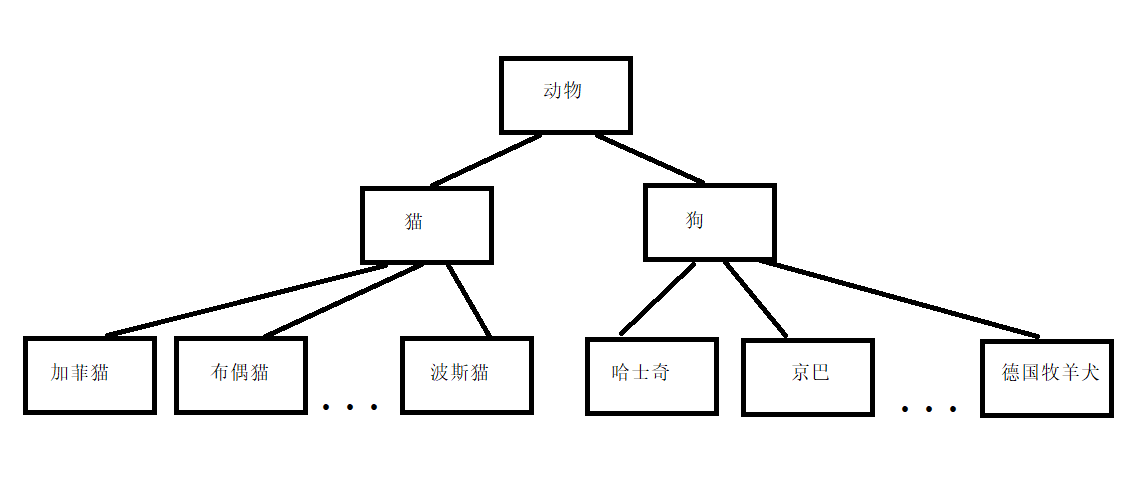
当定义这些类时,下级别的成员除了拥有上一级的共性,还有自己的特性
这个时候就可以考虑继承的技术来减少代码冗余
继承的基本语法
语法:class 子类 : 继承方式 父类
#include <iostream>
#include <string>

using namespace std;

class Animal {
private:
    string name;
    int age;
    int weight;
    string color;

public:
    Animal(string name, int age, int weight, string color) : name(name), age(age), weight(weight), color(color) {}

    void eat() {
        cout << this->name << "is Eating..." << endl;
    }

    // Getter Setter
#pragma region Getter Setter
    string getName() const {
        return name;
    }

    void setName(string name) {
        this->name = name;
    }

    int getAge() const {
        return age;
    }

    void setAge(int age) {
        this->age = age;
    }

    int getWeight() const {
        return weight;
    }

    void setWeight(int weight) {
        this->weight = weight;
    }

    string getColor() const {
        return color;
    }

    void setColor(string color) {
        this->color = color;
    }
#pragma endregion
};

class Dog : public Animal {// 子类

public:
    Dog(string name, int age, int weight, string color) : Animal(name, age, weight, color) {}

    void bark() {
        cout << this->getName() << " is Barking..." << endl;    // 利用Getter访问私有属性
    }
};

class Cat : public Animal {// 子类
public:
    Cat(string name, int age, int weight, string color) : Animal(name, age, weight, color) {}
    void meow() {
        cout << this->getName() << " is Meowing..." << endl;    // 利用Getter访问私有属性
    }
};

// override operator<<
ostream& operator<<(ostream& os, const Animal& animal) {    // 这里声明的常对象,常对象只能调用常函数,所以需要将Getter方法声明为常函数
    os << "Name: " << animal.getName() << endl;
    os << "Age: " << animal.getAge() << endl;
    os << "Weight: " << animal.getWeight() << endl;
    os << "Color: " << animal.getColor() << endl;
    return os;
}

int main() {
    Dog dog("Dog", 2, 5, "White");
    dog.bark();

    Cat cat("Cat", 3, 4, "Black");
    cat.meow();

    cout << dog << endl;
    cout << cat << endl;

    return 0;
}
继承方式
根据上一章继承的基本语法:class 子类 : 继承方式 父类
继承方式中一共有三种:
- 公共继承
- 保护继承
- 私有继承
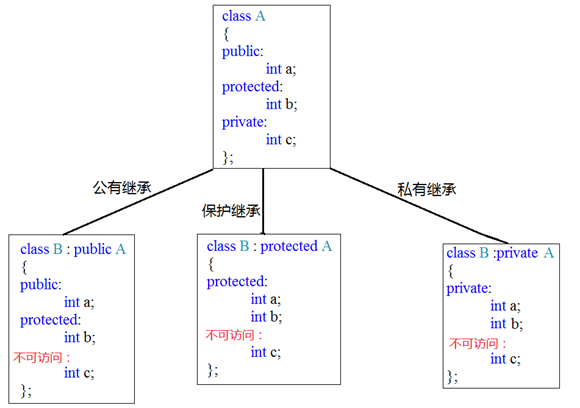
父类中私有属性,无论是什么继承方式,都不可访问
当继承方式为共有继承时,子类会保留父类中的属性访问权限
当继承方式为保护继承时,子类会将父类中的属性访问权限都修改为保护权限
当继承方式为私有继承时,子类会将父类中的属性访问权限都修改为私有权限
示例:
#include <iostream>
#include <string>

using namespace std;

class A {
public:
    int a;
protected:
    int b;
private:
    int c;

public:
    A(int a, int b, int c) : a(a), b(b), c(c) {};
};

class B : public A {
public:
    B(int a, int b, int c) : A(a, b, c) {};

    void printB() {
        this->a;
        this->b;
        // this->c;    // error
    }
};

class C : protected A {
public:
    C(int a, int b, int c) : A(a, b, c) {};

    void printC() {
        this->a;
        this->b;
        // this->c;
    }
};

class D : private A {
public:
    D(int a,int b,int c) : A(a,b,c) {};

    void printD() {
        this->a;
        this->b;
        // this->c;
    }
};

int main() {
    // 公有继承
    B b(1,2,3);
    cout << b.a << endl;
    // cout << b.b << endl;    // b.b为protected

    // 保护继承
    C c(1,2,3);
    // cout << c.a << endl;    // c.c为protected
    // cout << c.b << endl;    // c.b为protected

    // 私有继承
    D d(1,2,3);
    // cout << d.a << endl;    // d.a为private
    // cout << d.b << endl;    // d.b为private

    return 0;
}
继承中的对象模型
#include <iostream>
#include <string>

using namespace std;

class A {
private:
    int a;
protected:
    int b;
public:
    int c;
};

class B : public A{
public:
    int d;
};

class C : protected A {
public:
    int d;
};

class D : private A {
public:
    int d;
};

int main() {

    B b;
    cout << sizeof(b) << endl;  // 16,说明继承了A类中的所有属性

    C c;
    cout << sizeof(c) << endl;  // 16

    D d;
    cout << sizeof(d) << endl;  // 16

    /*
        父类中私有属性成员,只是被编译器隐藏了,因此访问不到,但确实是继承下去的
        所以会占有内存空间
        利用开发人员命令提示工具查看对象模型
        跳转到源码的地址下,输入命令:
        cl /d1 reportSingleClassLayout类名 文件名
        比如:cl /d1 reportSingleClassLayoutB B.cpp
    */

    return 0;
}
继承中构造和析构顺序
子类继承父类后,当创建子类对象,也会调用父类的构造函数
示例:
#include <iostream>
#include <string>

using namespace std;

class A {
    public:
        int a;
        A(int a) : a(a) {
            cout << "调用了A类的构造函数" << endl;
        }

        ~A () {
            cout << "调用了A类的析构函数" << endl;
        }
};

class B : public A {
public:
    int b;
    B(int a, int b) : A(a), b(b) {
        cout << "调起了B类的构造函数" << endl;
    }

    ~B() {
        cout << "调起了B类的析构函数" << endl;
    }
};

int main() {
    B b(1, 2);  // A B B A
    /*
        调用了A类的构造函数
        调起了B类的构造函数
        调起了B类的析构函数
        调用了A类的析构函数
    */

    return 0;
}
结论:构造函数顺序:先有父后有子;析构与构造的顺序相反:先析构子后析构父
继承中同名成员的处理方式
在子类对象后添加作用域:b.A::a(b表示B类对象b,它的父类是A,所以访问A类中的属性a需要添加上作用域)
示例:
#include <iostream>
#include <string>

using namespace std;

class A {
public:
    int a;
    A() {
        a = 10;
    }

    void print() {
        cout << "A类中的属性a为:" << a << endl;
    }
};

class B : public A {
public:
    int a;

    B() {
        a = 20;
    }

    void print() {
        cout << "B类中的属性a为:" << a << endl;
    }
};

int main() {
    B b;

    // 同名成员变量的访问方式:
    cout << b.a << endl;    // 20,表示子类的成员变量
    cout << b.A::a << endl; // 10,如果通过子类对象访问到父类中同名成员,需要加作用域

    // 同名成员函数的访问方式:
    b.print();  // B类中的属性a为:20
    b.A::print();   // A类中的属性a为:10

    return 0;
}
继承同名静态成员处理方式
静态成员和非静态成员出现同名,处理方式一致
- 访问子类同名成员,直接访问即可
- 访问父类同名成员,需要加作用域
示例:
#include <iostream>
#include <string>

using namespace std;

class A {
public:
    static int a;

    static void print() {
        cout << a << endl;
    }
};

int A::a = 10;

class B : public A {
public:
    static int a;

    static void print() {
        cout << a << endl;
    }
};

int B::a = 20;

int main() {
    B b;

    cout << b.a << endl;    // 20
    cout << b.A::a << endl; // 10

    cout << B::a << endl;   // 20
    cout << B::A::a << endl;    // 10

    b.print();  // 20
    b.A::print();   // 10

    B::print(); // 20
    B::A::print();  // 10

    return 0;
}
总结:同名静态成员处理方式和非静态处理方式,只不过有两种访问的方式(通过对象和通过类名)
多继承语法
C++允许一个类继承多个类
语法:class 子类 : 继承方式 父类1, 继承方式2 父类2
多继承可能引发父类中有同名成员出现,需要加作用域区分
实际开发中不建议用多继承
示例:
#include <iostream>
#include <string>

using namespace std;

class A {
public:
    int a;
    A() : a(10) {}
};

class B {
public:
    int a;
    B() : a(20) {}
};

class C : public A , public B{  // 继承于A和B
public:
    int a;
    C() : a(30) {}
};

int main() {
    C c;
    cout << c.a << endl;    // 30
    cout << c.B::a << endl; // 20
    cout << c.A::a << endl; // 10

    return 0;
}
菱形继承(虚继承)
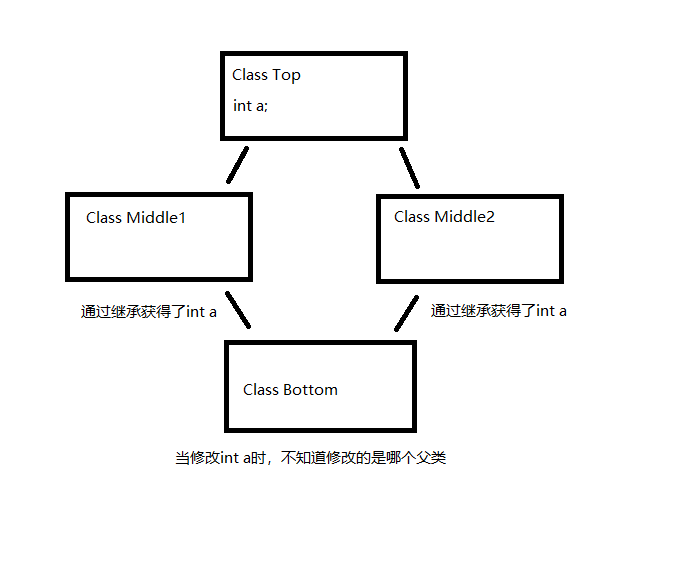
示例:
#include <iostream>
#include <string>

using namespace std;

class Top {
public:
    int a = 10;
};

class Middle1 : public Top {};

class Middle2 : public Top {};

class Bottom : public Middle1, public Middle2 {};

int main() {
    Bottom b;
    //b.a = 20;   // 报错,提示Bottom::a不明确

    b.Middle1::a = 20;
    b.Middle2::a = 30;

    // 当菱形继承,两个父类拥有相同数据,需要加以作用域区分
    cout << "b.Middle1::a = " << b.Middle1::a << endl;
    cout << "b.Middle2::a = " << b.Middle2::a << endl;

    // 实际上,b只需要一份数据即可,菱形继承导致数据有两份,资源浪费

    return 0;
}
解决方法——虚继承:
在继承之前加上virtual,如class Middle1 :virtual public Top{}
#include <iostream>
#include <string>

using namespace std;

class Top {
public:
    int a = 10;
};

class Middle1 :virtual public Top {};   // 在继承前加上virtual,表示虚继承

class Middle2 :virtual public Top {};

class Bottom : public Middle1, public Middle2 {};

int main() {
    Bottom b;
    //b.a = 20;   // 报错,提示Bottom::a不明确

    b.Middle1::a = 20;
    b.Middle2::a = 30;

    // 当菱形继承,两个父类拥有相同数据,需要加以作用域区分
    cout << "b.Middle1::a = " << b.Middle1::a << endl;  // 30
    cout << "b.Middle2::a = " << b.Middle2::a << endl;  // 30

    // 实际上,b只需要一份数据即可,菱形继承导致数据有两份,资源浪费
    b.a = 40;
    cout << "b.a = " << b.a << endl;    // 40

    return 0;
}
虚继承(Virtual Inheritance)的底层原理是通过虚基表指针(vbptr)和虚基表(vbtable)的间接寻址机制实现的
1. 内存布局抽象示例
对象 D 的内存布局大致如下(以 MSVC 为例):
+-------------------+
| D 对象的内存布局   |
+-------------------+
| B 的成员(非虚基类)|
| vbptr_B (→vbtable)|
|-------------------|
| C 的成员(非虚基类)|
| vbptr_C (→vbtable)|
|-------------------|
| A 的成员 (a)       | ← 唯一一份基类 A 的实例
+-------------------+
- 虚基表指针(vbptr):
B和C中各有一个,指向各自的虚基表。 - 虚基表(vbtable):存储虚基类
A相对于当前子类位置的 偏移量。
2. 虚基表内容示例
假设 B 的虚基表内容为:
vbtable for B:
+----------------+
| offset to A: 20|
+----------------+
- 中间类(B/C)的行为:
- B和C的成员变量
a并不直接存储在自己的内存区域,而是通过虚基表指针(vbptr)和虚基表(vbtable)定位到唯一的A::a。 - 例如,当通过
B访问a时:- 通过
vbptr_B找到虚基表。 - 查表得到
A的偏移量(如+20 字节)。 - 计算
vbptr_B 地址 + 偏移量→ 访问A::a。
- 通过
- 底层实现与引用的区别:
- 引用是编译期的别名,不占用内存,操作时直接绑定目标地址。
- 虚继承访问是运行期的间接寻址,需要两次内存访问(取虚基表指针 → 查表 → 计算偏移量 → 访问目标数据)。
3. 访问虚基类成员
当访问 D::a 时:
- 通过
B或C的vbptr找到对应的虚基表。 - 根据表中的 偏移量 定位到唯一的
A实例。
多态
多态分为两类:
- 静态多态:函数重载和运算符重载属于静态多态,复用函数名
- 动态多态:派生类和虚函数实现运行时多态
静态多态和动态多态的区别:
- 静态多态的函数地址早绑定 - 编译阶段确定函数地址
- 动态多态的函数地址晚绑定 - 运行阶段确定函数地址
示例:
#include <iostream>
#include <string>

using namespace std;

class Animal {
public:
    string name;
    int age;

    Animal(string name, int age) {
        this->name = name;
        this->age = age;
    }

    virtual void eat() {
        cout << "Animal is Eating" << endl;
    }

    virtual void speek() {
        cout << "Animal is speeking" << endl;
    }
};

class Dog : public Animal {
public:
    Dog(string name, int age) : Animal(name, age) {

    }

    void eat() override {
        cout << "Dog is Eating" << endl;
    }

    void speek() override {
        cout << "Dog is speeking" << endl;
    }
};

int main() {
    Animal *animal = new Dog("Dog", 5);
    animal->eat();
    animal->speek();

    return 0;
}
动态多态满足条件:
- 有继承关系
- 子类重写父类的虚函数
多态的原理
首先从内存的角度,看有虚函数的类与没有虚函数的类之间的差异:
#include <iostream>
#include <string>

using namespace std;

class A1 {
public:
    void eat() {
        cout << "A1 eat" << endl;
    }
};

class A2 : public A1 {
public:
    void eat() {
        cout << "A2 eat" << endl;
    }
};

class B1 {
public:
    virtual void eat() {
        cout << "B1 eat" << endl;
    }
};

class B2 : public B1 {
public:
    void eat() override {// 隐含virtual,重写虚函数后还是虚函数
        cout << "B2 eat" << endl;
    }
};

int main() {
    // A2 是 A1 的子类,B2 是 B1 的子类
    A1 a1;
    B1 b1;

    cout << sizeof(a1) << endl; // 1
    cout << sizeof(b1) << endl; // 8

    // 虽然两个继承类都是相似的,但是由于B1中的方法是虚函数
    // 所以导致了最后父类之间的占用内存大小是不同的

    return 0;
}
- 空类规则(
A1的情况) - 当类没有成员变量时,C++标准要求其对象至少占用 1字节(用于标识不同对象的内存地址)。 -A1中没有虚函数和成员变量,因此sizeof(a1) = 1。 - 虚函数表指针(
B1的情况) - 当类包含虚函数时,编译器会隐式地为其添加一个 虚函数表指针(vptr),在64位系统中占 8字节。 -B1包含虚函数,因此sizeof(b1) = 8(仅vptr大小,无其他成员变量)。
虚函数与多态底层原理
- 虚函数表(vtable)
- 实现方式:每个包含虚函数的类都有一个隐藏的虚函数表,表中存储该类所有虚函数的函数指针。
-
内存布局(以
B1和B2为例):``` cpp复制// B1 的虚函数表 [&B1::eat] --> 地址1(指向B1::eat)
// B2 的虚函数表 [&B2::eat] --> 地址2(指向B2::eat) ``` 2. 虚函数表指针(vptr)
-
每个对象在构造时,会通过 vptr 指向其所属类的虚函数表。
-
内存验证:
B1* p = new B2();
 p->eat(); // 输出 "B2 eat",通过vptr找到B2的虚函数表
3. 多态底层流程
-
编译阶段:
- 编译器为每个包含虚函数的类生成虚函数表。
-
在对象内存首部插入vptr(验证方法:对比
B1和B1移除虚函数后的内存差异)。 2. 运行时阶段: -
通过对象的vptr找到对应的虚函数表。
- 从虚函数表中取出目标函数的地址进行调用。
通过Visual Studio提供的开发者工具进行验证,结果如下:
- 输入命令
cl /d1 reportSingleClassLayoutB1 Main.cpp,返回如下所示:
``` Main.cpp
class B1 size(4): +--- 0 | {vfptr} +---
B1::$vftable@:
| &B1_meta
| 0
0 | &B1::eat
``
2. 输入命令
cl /d1 reportSingleClassLayoutB2 Main.cpp`,返回结果如下所示:
``` Main.cpp
class B2 size(4): +--- 0 | +--- (base class B1) 0 | | {vfptr} | +--- +---
B2::$vftable@: | &B2_meta | 0 0 | &B2::eat ```
多态案例:计算器类
案例描述:
分别利用普通写法和多态技术,设计实现两个操作数进行运算的计算器类
多态的优点:
- 代码组织结构清晰
- 可读性强
- 利于前期和后期的扩展以及维护
普通的实现方式:
#include <iostream>
#include <string>

using namespace std;

class Calculator {
public:
    int num1;
    int num2;

    Calculator(int num1, int num2) {
        this->num1 = num1;
        this->num2 = num2;
    }

    int calculate(string opera) {
        if (opera == "+") {
            return num1 + num2;
        }
        else if (opera == "-") {
            return num1 - num2;
        }
        else if (opera == "*") {
            return num1 * num2;
        };  // 假设功能就开发到这里
    }
};

int main() {
    Calculator c(10, 20);

    cout << c.num1 << "+" << c.num2 << "=" << c.calculate("+") << endl; // 30
    cout << c.num1 << "-" << c.num2 << "=" << c.calculate("-") << endl; // -10
    cout << c.num1 << "*" << c.num2 << "=" << c.calculate("*") << endl; // 200

    return 0;
}
弊端:当后期添加新功能时,需要对Calculator类进行修改,当功能变多时,类会变得臃肿,可读性变差。同时功能的增多,维护成本又会增加,一个功能出错就可能导致后面开发时各种问题
优势:开发时简单高效
多态实现:
#include <iostream>
#include <string>

using namespace std;

class AbstractCalculator {
public:
    int num1;
    int num2;

    virtual int calculate(string op) { return 0; };
};

class AddCalculator : public AbstractCalculator {
public:
    int calculate(string op) override {
        if (op == "+") {
            return num1 + num2;
        }
        throw "Operator not supported"; // throw 抛出异常
    }
};

class MulCalculator : public AbstractCalculator {
public:
    int calculate(string op) override {
        if (op == "*") {
            return num1 * num2;
        }
        throw "Operator not supported";
    }
};

class SubCalculator : public AbstractCalculator {
public:
    int calculate(string op) override {
        if (op == "-") {
            return num1 - num2;
        }
        throw "Operator not supported";
    }
};

class DivCalculator : public AbstractCalculator {
public:
    int calculate(string op) override {
        if (op == "/") {
            return num1 / num2;
        }
        throw "Operator not supported";
    }
};

int main() {

    AbstractCalculator* calculator = new AddCalculator();
    calculator->num1 = 10;
    calculator->num2 = 20;
    cout << calculator->num1 << "+" << calculator->num2 << "=" << calculator->calculate("+") << endl;   // 30

    calculator = new SubCalculator();
    calculator->num1 = 10;
    calculator->num2 = 20;
    cout << calculator->num1 << "-" << calculator->num2 << "=" << calculator->calculate("-") << endl;   // -10

    calculator = new MulCalculator();
    calculator->num1 = 10;
    calculator->num2 = 20;
    cout << calculator->num1 << "*" << calculator->num2 << "=" << calculator->calculate("*") << endl;   // 200

    calculator = new DivCalculator();
    calculator->num1 = 100;
    calculator->num2 = 20;
    cout << calculator->num1 << "/" << calculator->num2 << "=" << calculator->calculate("/") << endl;   // 5

// 使用完最好可以手动释放内存
    delete calculator;
    return 0;
}
优点:以模块化的思想设计了类,当一个模块出现问题,不会影响其他模块问题;虽然代码量增大了,但是结构更加清晰,提高了可读性,后期更好维护
弊端:开发难度相对高一些,占用内存也会变大,开发效率降低
纯虚函数和抽象类
在多态中,通常父类中虚函数的实现是毫无意义的,主要都是调用子类重写的内容
因此可以将虚函数改为纯虚函数
纯虚函数语法:virtual 返回值类型 函数名(参数列表) = 0;
当类中有了纯虚函数,这个类也称为抽象类
抽象类特点:
- 无法实例化对象
- 子类必须重写抽象类中的纯虚函数,否则也属于抽象类
示例:
#include <iostream>
#include <string>

using namespace std;

class AbstractClass {
public:
    virtual void templateMethod() = 0;
};

class C1 : public AbstractClass {
public:
    void show() {
        cout << "C1::show()" << endl;
    }
};

class C2 : public AbstractClass {
public:
    void templateMethod() override {
        show();
    }

    void show() {
        cout << "C2::show()" << endl;
    }
};

int main() {
    //AbstractClass *abstractClass = new AbstractClass(); // 报错,抽象类不能实例化
    //C1 *c = new C1();   // 如果没有实现抽象类中的虚函数,也被视为抽象类
    C2 *c2 = new C2();
    c2->templateMethod(); // 输出 C2::show()

    return 0;
}
虚析构和纯虚析构
多态使用时,如果子类中有属性开辟到堆区,那么父类指针在释放时无法调用到子类的析构代码
解决方式:将父类中的析构函数改为虚析构或者纯虚析构
虚析构和纯虚析构的共性:
- 可以解决父类指针释放子类对象
- 都需要具体的函数实现
虚析构和纯虚析构区别:
- 如果是纯虚析构,该类属于抽象类,无法实例化对象
虚析构语法:virtual ~类名(){}
纯虚析构语法:virtual ~类名() = 0;
产生问题的代码如下:
#include <iostream>
#include <string>

using namespace std;

class Animal {
public:
string* name;
Animal() {
cout << "Animal构造函数被调用了" << endl;
}

Animal(string name) {
this->name = new string(name);
}

virtual void speak() = 0;

~Animal() {
cout << "Animal析构函数被调用了" << endl;
if (this->name != nullptr) {
delete this->name;
            this->name = nullptr;
}
}
};

class Cat : public Animal {
public:
Cat() {
cout << "Cat构造函数被调用了" << endl;
}

Cat(string name) : Animal(name) {
cout << "Cat构造函数被调用了" << endl;
}

void speak() override {
cout << *name << "叫了一声" << endl;
}

~Cat() {
cout << "Cat析构函数被调用了" << endl;
if (this->name != nullptr) {
delete this->name;
this->name = nullptr;
}
}
};

int main() {
Animal *cat = new Cat("小猫");
cat->speak();
delete cat;

/*
Animal构造函数被调用了
Cat构造函数被调用了
小猫叫了一声
Animal析构函数被调用了
*/

    return 0;
}
可以发现当删除堆内的对象时,只会调用父类的析构函数,如果子类中有堆内的数据时,可能会引起内存泄漏
虚析构
解决的方式很简单,依旧是通过虚函数解决:
#include <iostream>
#include <string>

using namespace std;

class Animal {
public:
string* name;
Animal() {
cout << "Animal构造函数被调用了" << endl;
}

Animal(string name) {
cout << "Animal构造函数被调用了" << endl;
this->name = new string(name);
}

virtual void speak() = 0;

virtual ~Animal() {
cout << "Animal析构函数被调用了" << endl;
if (this->name != nullptr) {
delete this->name;
            this->name = nullptr;
}
}
};

class Cat : public Animal {
public:
Cat() {
cout << "Cat构造函数被调用了" << endl;
}

Cat(string name) : Animal(name) {
cout << "Cat构造函数被调用了" << endl;
}

void speak() override {
cout << *name << "叫了一声" << endl;
}

~Cat() override {
cout << "Cat析构函数被调用了" << endl;
if (this->name != nullptr) {
delete this->name;
this->name = nullptr;
}
}
};

int main() {
Animal *cat = new Cat("小猫");
cat->speak();
delete cat;

/*
Animal构造函数被调用了
Cat构造函数被调用了
小猫叫了一声
Cat析构函数被调用了
Animal析构函数被调用了
*/

    return 0;
}
纯虚析构
纯虚析构如果按照virtual ~Animal() = 0;这样写,是会报错的,这是由于父类的析构函数也会被调用,就代表父类也需要实现析构函数。所以为了避免报错,还需要在类外将纯虚析构的函数实现出来
#include <iostream>
#include <string>

using namespace std;

class Animal {
public:
string* name;
Animal() {
cout << "Animal构造函数被调用了" << endl;
}

Animal(string name) {
cout << "Animal构造函数被调用了" << endl;
this->name = new string(name);
}

virtual void speak() = 0;

virtual ~Animal() = 0;
};

Animal::~Animal() {
cout << "Animal纯虚析构函数被调用了" << endl;
if (this->name != nullptr) {
delete this->name;
}
}

class Cat : public Animal {
public:
Cat() {
cout << "Cat构造函数被调用了" << endl;
}

Cat(string name) : Animal(name) {
cout << "Cat构造函数被调用了" << endl;
}

void speak() override {
cout << *name << "叫了一声" << endl;
}

~Cat() override {
cout << "Cat析构函数被调用了" << endl;
if (this->name != nullptr) {
delete this->name;
this->name = nullptr;
}
}
};

int main() {
Animal *cat = new Cat("小猫");
cat->speak();
delete cat;

/*
Animal构造函数被调用了
Cat构造函数被调用了
小猫叫了一声
Cat析构函数被调用了
Animal纯虚析构函数被调用了
*/

    return 0;
}
C++开发规则
如果一个类包含虚函数,它几乎总是需要一个虚析构函数。 这是C++的一个重要原则,特别是当开发人员计划通过基类指针管理派生类对象时。
多态案例:组装计算机
以CPU、Graphics Card、Memory为基类,以对应零件的生产商家为子类,添加到Computer类中,Computer类中调用所有零件的运行接口
#include <iostream>
#include <string>

using namespace std;
// 零件基类(抽象类)
class CPU {
public:
    virtual void calculate() = 0;
    virtual ~CPU() = 0;
};

class GraphicsCard {
public:
    virtual void display() = 0;
    virtual ~GraphicsCard() = 0;
};

class Memory {
public:
    virtual void storeData() = 0;
    virtual ~Memory() = 0;
};

// 实现纯虚析构函数,防止报错
CPU::~CPU() {}
GraphicsCard::~GraphicsCard() {}
Memory::~Memory() {}

// 电脑类
class Computer {
public:
    CPU* cpu;
    GraphicsCard* graphicsCard;
    Memory* memory;

    Computer(CPU* cpu, GraphicsCard* graphicsCard, Memory* memory) {
        this->cpu = cpu;
        this->graphicsCard = graphicsCard;
        this->memory = memory;
    }

    void run() {
        cpu->calculate();
        graphicsCard->display();
        memory->storeData();
    }

    // 防止内存泄露
    ~Computer() {
        if (cpu != nullptr) {
            delete cpu;
            cpu = nullptr;
        }

        if (graphicsCard != nullptr) {
            delete graphicsCard;
            graphicsCard = nullptr;
        }

        if (memory != nullptr) {
            delete memory;
            memory = nullptr;
        }
    }
};

// 具体实现类
class IntelCPU : public CPU {
public:
    void calculate() override {
        std::cout << "Intel CPU 计算中..." << std::endl;
    }

    ~IntelCPU() override {
        std::cout << "Intel CPU 析构函数" << std::endl;
    }
};

class AmdCPU : public CPU {
public:
    void calculate() override {
        std::cout << "Amd CPU 计算中..." << std::endl;
    }

    ~AmdCPU() override {
        std::cout << "Amd CPU 析构函数" << std::endl;
    }
};

class NvidiaGraphicsCard : public GraphicsCard {
public:
    void display() override {
        std::cout << "Nvidia 显卡 显示中..." << std::endl;
    }

    ~NvidiaGraphicsCard() override {
        std::cout << "Nvidia 显卡 析构函数" << std::endl;
    }
};

class AmdGraphicsCard : public GraphicsCard {
public:
    void display() override {
        std::cout << "Amd 显卡 显示中..." << std::endl;
    }

    ~AmdGraphicsCard() override {
        std::cout << "Amd 显卡 析构函数" << std::endl;
    }
};

class SamsungMemory : public Memory {
public:
    void storeData() override {
        std::cout << "Samsung 内存 存储数据中..." << std::endl;
    }

    ~SamsungMemory() override {
        std::cout << "Samsung 内存 析构函数" << std::endl;
    }
};

class KingstonMemory : public Memory {
public:
    void storeData() override {
        std::cout << "Kingston 内存 存储数据中..." << std::endl;
    }

    ~KingstonMemory() override {
        std::cout << "Kingston 内存 析构函数" << std::endl;
    }
};

int main() {
    Computer *computer_01 = new Computer(new IntelCPU(), new NvidiaGraphicsCard(), new SamsungMemory());
    Computer *computer_02 = new Computer(new AmdCPU(), new AmdGraphicsCard(), new KingstonMemory());
    Computer *computer_03 = new Computer(new AmdCPU(), new NvidiaGraphicsCard(), new KingstonMemory());

    cout << "电脑_01开启:" << endl;
    computer_01->run();
    cout << endl;

    cout << "电脑_02开启:" << endl;
    computer_02->run();
    cout << endl;

    cout << "电脑_03开启:" << endl;
    computer_03->run();
    cout << endl;

    delete computer_01;
    delete computer_02;
    delete computer_03;


    return 0;
}